iOS17のリリースから、新しいアプリを作る際、UIKitではなくSwiftUIを採用するようになりました。Observationマクロにより、ViewModelのアーキテクチャが作りやすくなっていたり、様々な点でSwftUIはUIKitよりコードが書きやすい部分がいくつもあります。
グラデーションもその一つであり、UIKitでは簡単なグラデーションを実装するだけでも面倒だったのが、SwiftUIでは結構楽にかつ柔軟に書くことができるようになっています。またグラデーションのアニメーションも実装しやすくなっています。
今回は、SwiftUIでのグラデーションの実装方法をまとめます。今回のコードはすべてGithubにて公開していますので、是非手元で触ってみてください。
SwiftUIで最もよく使うグラデーション
SwiftUIでは、例えばColorなどに.gradientとするだけで簡単にいい感じのグラデーションをかけることができます。あまりにお手軽すぎるので、もともとデザインにはグラデーションがなかったのに、勝手につけてしまうほどです。
おそらく、SwiftUIのグラデーションの中で最も使われているのではないでしょうか。
import SwiftUI

struct SimpleGradientView: View {
    var body: some View {
        HStack(spacing: 24) {
            RoundedRectangle(cornerRadius: 12)
                .fill(Color.blue)
                .frame(width: 100, height: 100)

            RoundedRectangle(cornerRadius: 12)
                .fill(Color.blue.gradient)
                .frame(width: 100, height: 100)
        }
    }
}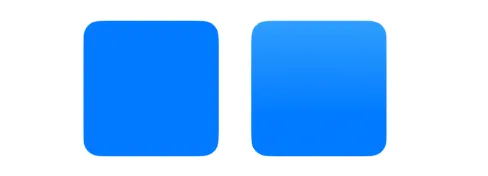
比較するために、2つ並べてみました。左側は普通の青色、右側は.gradientをつけた青色です。
左側だけ、上部が若干薄くなり下に行くに従って本来の青に向かってグラデーションしているのがわかります。
この仕様は変更することができないようですが、とりあえずグラデーションつけておこうという場合には最適です。是非使ってみてください。
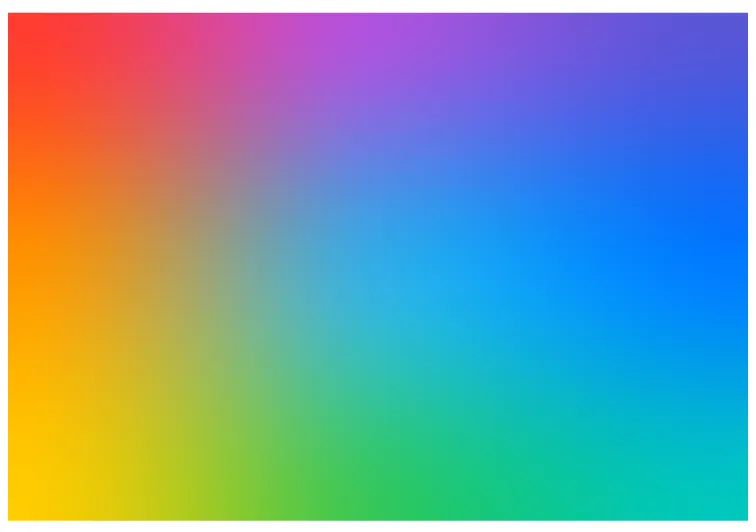
LinearGradient
LinearGradientは、線形の色の変化を実装するためのグラデーションです。起点と終点を指定して、その間で色が渡り変わるように描画されます。一番シンプルで簡単なグラデーションです。ほとんどの場合は、このシンプルなLinearGraidentの実装で事足りるかと思います。
The gradient applies the color function along an axis, as defined by its start and end points. The gradient maps the unit space points into the bounding rectangle of each shape filled with the gradient.
When using a linear gradient as a shape style, you can also uselinearGradient(_:startPoint:endPoint:).
シンプルな実装
init(gradient: Gradient, startPoint: UnitPoint, endPoint: UnitPoint)
Creates a linear gradient from a base gradient.
一つ目は、Gradientを指定してLinearGradientをイニシャライズし、.fillで使用しています。
パラメータの詳細
gradient: 色の配列を指定します。startPoint: グラデーションの起点を指定します。UnitPointで表します。例:.top,.leading等endPoint: グラデーションの終点を指定します。UnitPointで表します。
サンプルコード
import SwiftUI
struct LinearGradientExample: View {
var body: some View {
ZStack {
RoundedRectangle(cornerRadius: 12)
.fill(
LinearGradient(
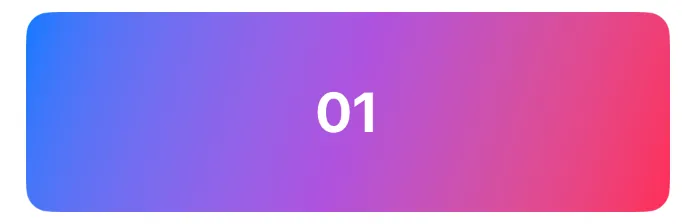
gradient: Gradient(colors: [.blue, .purple, .pink]),
startPoint: .topLeading,
endPoint: .bottomTrailing
)
)
.frame(height: 100)
IndexText(text: "01")
}
}
}
めちゃくちゃシンプルですね。startPointとendPointをUnitPointで指定するだけなので、かなり実装が簡単に感じます。その他のLinear以外のグラデーションでもUnitPointは出てきます。
foregroundStyleでグラデーションを使う
.fillではなく、もっとシンプルに、foregroundStyleでもlinearGradientは使用できます。この書き方だと、現状単色の色を設定している箇所をそのままグラデーションに置き換えることができます。
サンプルコード
import SwiftUI
struct LinearGradientExample: View {
var body: some View {
ZStack {
RoundedRectangle(cornerRadius: 12)
.foregroundStyle(
.linearGradient(
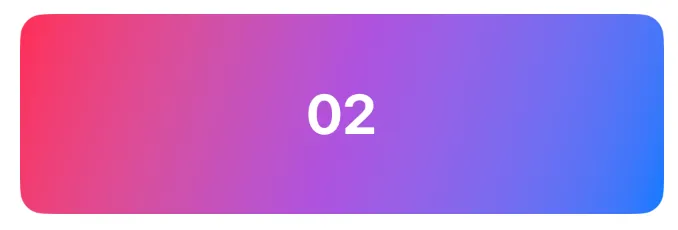
Gradient(colors: [.blue, .purple, .pink]),
startPoint: .bottomTrailing,
endPoint: .topLeading
)
)
.frame(height: 100)
IndexText(text: "02")
}
}
}
foregroundStyleで使えるということは、Shape以外にもグラデーションが簡単に適用できるということです。
TextにLinearGradientを適用させる
先ほどと同様にforegroudStyleでTextにグラデーションを適用させてみます。

import SwiftUI

struct LinearGradientExample: View {
    var body: some View {
        Text("ROMIICK LLC.")
            .foregroundStyle(
                .linearGradient(
                    Gradient(colors: [.yellow, .pink, .indigo]),
                    startPoint: .leading,
                    endPoint: .trailing
                )
            )
            .font(.title)
            .bold()
    }
}
UIKitのときとは違い、グラデーションをTextに適用させるのはとても簡単です。UIKitのUILabelでは文字でmaskするなどの若干めんどくさい処理があった気がします。それに比べるとSwiftUIでは、単色を指定するのと同じやり方でグラデーションも指定できるようになっています。いいですね。
よりシンプルなイニシャライザを使う
init(colors: [Color], startPoint: UnitPoint, endPoint: UnitPoint)
Creates a linear gradient from a collection of colors.
colorsという配列を渡してイニシャライズする方法です。こちらのほうがよりシンプルですね。
import SwiftUI
struct LinearGradientExample: View {
var body: some View {
ZStack {
RoundedRectangle(cornerRadius: 12)
.foregroundStyle(
.linearGradient(
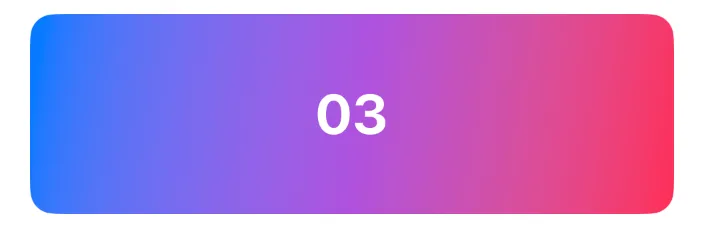
colors: [.blue, .purple, .pink], // <- これ
startPoint: .leading,
endPoint: .bottomTrailing
)
)
.frame(height: 100)
IndexText(text: "03")
}
}
}colorsというcolorの配列を渡すだけなので、こちらのほうがより直感的ですね。
stopsでより細かくグラデーションを指定する
/// A linear gradient defined by a collection of color stops.
///
/// The gradient applies the color function along an axis, as defined by its
/// start and end points. The gradient maps the unit space points into the
/// bounding rectangle of each shape filled with the gradient.
///
/// For information about how to use shape styles, see ``ShapeStyle``.
public static func linearGradient(stops: [Gradient.Stop], startPoint: UnitPoint, endPoint: UnitPoint) -> LinearGradientGradient.Stopの定義を見てみましょう。
/// A color gradient represented as an array of color stops, each having a
/// parametric location value.
@available(iOS 13.0, macOS 10.15, tvOS 13.0, watchOS 6.0, *)
@frozen public struct Gradient : Equatable {

    /// One color stop in the gradient.
    @frozen public struct Stop : Equatable {

        /// The color for the stop.
        public var color: Color

        /// The parametric location of the stop.
        ///
        /// This value must be in the range `[0, 1]`.
        public var location: CGFloat

        /// Creates a color stop with a color and location.
        public init(color: Color, location: CGFloat)

        /// Returns a Boolean value indicating whether two values are equal.
        ///
        /// Equality is the inverse of inequality. For any values `a` and `b`,
        /// `a == b` implies that `a != b` is `false`.
        ///
        /// - Parameters:
        ///   - lhs: A value to compare.
        ///   - rhs: Another value to compare.
        public static func == (a: Gradient.Stop, b: Gradient.Stop) -> Bool
    }

    /// The array of color stops.
    public var stops: [Gradient.Stop]

    /// Creates a gradient from an array of color stops.
    public init(stops: [Gradient.Stop])

    /// Creates a gradient from an array of colors.
    ///
    /// The gradient synthesizes its location values to evenly space the colors
    /// along the gradient.
    public init(colors: [Color])

    /// Returns a Boolean value indicating whether two values are equal.
    ///
    /// Equality is the inverse of inequality. For any values `a` and `b`,
    /// `a == b` implies that `a != b` is `false`.
    ///
    /// - Parameters:
    ///   - lhs: A value to compare.
    ///   - rhs: Another value to compare.
    public static func == (a: Gradient, b: Gradient) -> Bool
}このように、Gradient.Stopはcolorとlocationだけを保持します。locationは、0から1の間で指定する必要があります。
このGradient.Stopを使用してLinearGradientをイニシャライズしてみます。
import SwiftUI

struct LinearGradientExample: View {
    var body: some View {
        RoundedRectangle(cornerRadius: 12)
            .foregroundStyle(
                .linearGradient(
                    stops: [
                        .init(color: .red, location: 0.0),
                        .init(color: .yellow, location: 0.2),
                        .init(color: .blue, location: 1.0)
                    ],
                    startPoint: .topLeading,
                    endPoint: .bottomTrailing
                )
            )
            .frame(height: 100)

        IndexText(text: "04")
    }
}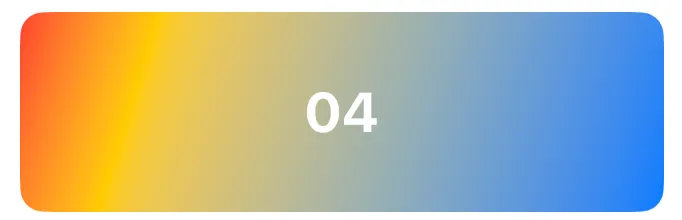
見ていただいてわかるように、topLeading(左上)からbottomTrailing(右下)に向けてLinearにグラデーションし、topLeadingから20%の位置で黄色のグラデーションがかかっています。
このように、細かくグラデーションの位置を指定したい場合は、このGradient.Stopを使用すれば実装できます。
LinearGradientをアニメーションさせる
せっかくなので、locationをState propertyにして、アニメーションさせてみましょう。
例として、グラデーションの真ん中んのblueのlocationを1秒ごとに1秒かけて0.25~0.75の間をランダムに取るようにしてみます。またそのアニメーションをループさせてみます。
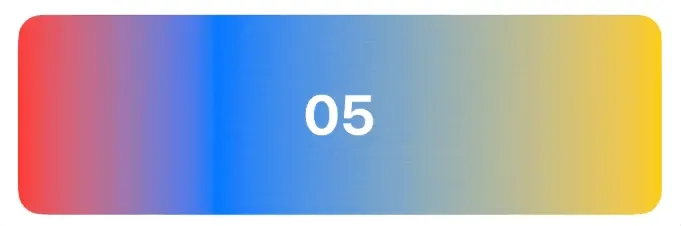
import SwiftUI

struct LinearGradientExample: View {

    @State private var location: CGFloat = 0.5

    var body: some View {
        ZStack {
            RoundedRectangle(cornerRadius: 12)
                .foregroundStyle(
                    .linearGradient(
                        stops: [
                            .init(color: .red, location: 0.0),
                            .init(color: .blue, location: location),
                            .init(color: .yellow, location: 1.0)
                        ],
                        startPoint: .leading,
                        endPoint: .trailing
                    )
                )
                .frame(height: 100)

            IndexText(text: "05")
        }
        .onReceive(Timer.publish(every: 1.0, on: .main, in: .common).autoconnect()) { _ in
            withAnimation(.linear(duration: 1.0)) {
                location = 0.5 + CGFloat.random(in: -0.25...0.25)
            }
        }
    }
}
このようにStateプロパティを使用することで、SwifUIではグラデーションのアニメーションも簡単に実装することができます。
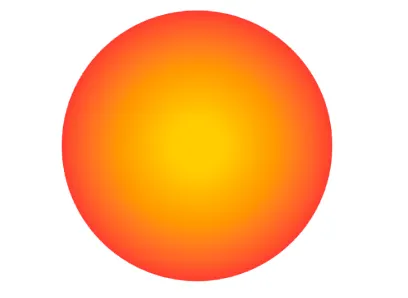
RadialGradient
RadialGradientは、中央点を基点として、等距離に円形上のグラデーションがかかります。起始の距離を表すstartRadiusと終了の距離を表すendRadiusを指定できます。
The gradient applies the color function as the distance from a center point, scaled to fit within the defined start and end radii. The gradient maps the unit space center point into the bounding rectangle of each shape filled with the gradient.
When using a radial gradient as a shape style, you can also useradialGradient(_:center:startRadius:endRadius:).
パラメータの詳細
gradient: 色の配列を指定します。center: グラディエントの中央点を指定します。UnitPointで表します。startRadius: 起始の距離を指定します。endRadius: 終了の距離を指定します。
centerはUnitPointなので、例えばViewの左上からのグラデーションとしたければ、.topLeadingと指定することができます。
サンプルコード
import SwiftUI

struct RadialGradientExample: View {
    var body: some View {
        Circle()
            .fill(
                RadialGradient(
                    gradient: Gradient(colors: [.yellow, .orange, .red]),
                    center: .center,
                    startRadius: 20,
                    endRadius: 100
                )
            )
            .frame(width: 200, height: 200)
    }
}
EllipticalGradient
EllipticalGradientは、楕円形のグラデーションです。円を基にした様に色を変化させるグラディエントです。「RadialGradient」の特化版で、長軸和短軸の関係を込めて、変化の方向を設定できます。
The gradient applies the color function as the distance from a center point, scaled to fit within the defined start and end radii. The gradient maps the unit space center point into the bounding rectangle of each shape filled with the gradient.
When using a radial gradient as a shape style, you can also useradialGradient(_:center:startRadius:endRadius:).
パラメータの詳細
gradient: 色の配列を指定します。center: グラデーションの中央点を指定します。startRadiusFraction: グラデーションの開始地点を指定します。(0~1)endRadiusFraction: グラデーションの終了地点を指定します。(0~1)
サンプルコード
import SwiftUI

struct EllipticalGradientExample: View {
    var body: some View {
        Ellipse()
            .fill(
                EllipticalGradient(
                    gradient: Gradient(colors: [.green, .blue, .purple]),
                    center: .center,
                    startRadiusFraction: 0.0,
                    endRadiusFraction: 1.0
                )
            )
            .frame(width: 200, height: 100)
    }
}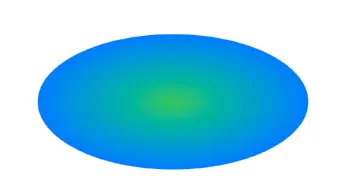
まあ、使う場面はほとんどないのかなとは思います。
AngularGradient
AngularGradientは、指定した中央点を周る色変化を実現します。回転の情報や始終点の位置を指定できます。
An angular gradient is also known as a “conic” gradient. This gradient applies the color function as the angle changes, relative to a center point and defined start and end angles. If endAngle - startAngle > 2π, the gradient only draws the last complete turn. If endAngle - startAngle < 2π, the gradient fills the missing area with the colors defined by gradient locations one and zero, transitioning between the two halfway across the missing area. The gradient maps the unit space center point into the bounding rectangle of each shape filled with the gradient.
When using an angular gradient as a shape style, you can also useangularGradient(_:center:startAngle:endAngle:),conicGradient(_:center:angle:), or similar methods.
サンプルコード
import SwiftUI

struct AngularGradientExample: View {
    var body: some View {
        VStack {
            Circle()
                .fill(
                    AngularGradient(
                        gradient: Gradient(colors: [.red, .yellow, .green, .blue, .purple, .red]),
                        center: .center,
                        startAngle: .degrees(0),
                        endAngle: .degrees(360)
                    )
                )
                .frame(width: 200, height: 200)

            Circle()
                .fill(
                    AngularGradient(
                        gradient: Gradient(colors: [.red, .yellow, .green, .blue, .purple, .red]),
                        center: .center,
                        angle: .degrees(180)
                    )
                )
                .frame(width: 200, height: 200)
        }
    }
}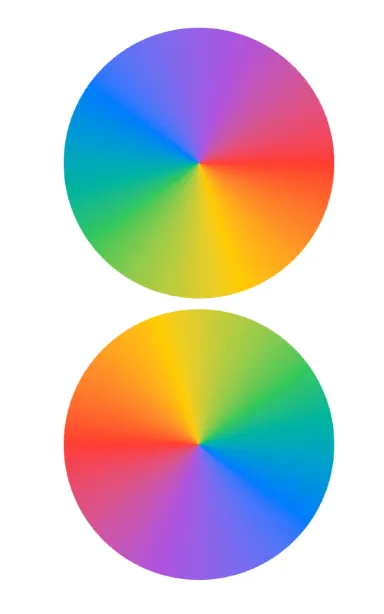
startAngleやendAngleを指定した場合は、どこからどこまでをグラデーションさせるかの指定になります。angleを指定した場合は、1周回るグラデーションになり、グラデーション自体が指定分回転します。
ほぼ同じグラデーションとしてconicGradientというメソッドが用意されているのですがangularGradientとの違いがわかりません。。
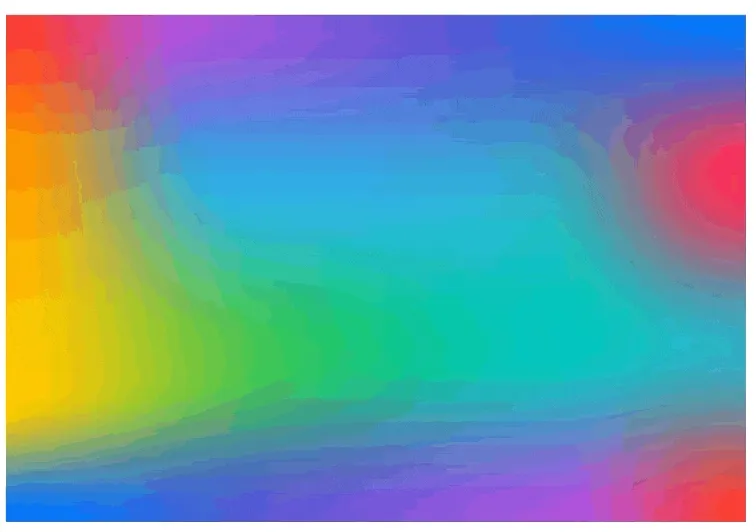
MeshGradient
MeshGradientは、格子状にポイントを配置し、滑らかなグラデーションを生成します。iOS18から導入された機能です。各頂点で異なる色を指定でき、柔軟性のあるビジュアル効果が得られます。
Each vertex has a position, a color and four surrounding Bezier control points (leading, top, trailing, bottom) that define the tangents connecting the vertex with its four neighboring vertices. (Vertices on the corners or edges of the mesh have less than four neighbors, they ignore their extra control points.) Control points may either be specified explicitly or implicitly.
When rendering, a tessellated sequence of Bezier patches are created, and vertex colors are interpolated across each patch, either linearly, or via another set of cubic curves derived from how the colors change between neighbors – the latter typically gives smoother color transitions..
パラメータの詳細
width: メッシュの横軸のポイントの数を指定します。height: メッシュの縦軸のポイントの数を指定します。colors: メッシュ内の各点で使用される色を指定します。points: 各色が配置されるポイントを指定します。SIMD2<Float>で表現します。
まずはシンプルな例を見ていきます。
サンプルコード
import SwiftUI

struct MeshGradientView: View {
    var body: some View {
        MeshGradient(width: 3, height: 3, points: [
          [0, 0],   [0.5, 0],   [1.0, 0],
          [0, 0.5], [0.5, 0.5], [1.0, 0.5],
          [0, 1.0], [0.5, 1.0], [1.0, 1.0]
        ], colors: [
          .red, .purple, .indigo,
          .orange, .cyan, .blue,
          .yellow, .green, .mint
        ])
        .frame(maxWidth: .infinity)
        .padding()
    }
}
※postsもcolorsも改行を使ってやると読みやすいですね。
結局すべての頂点が、0から1の間に収まるので、すべてのポイントのxとyを割合で指定するだけなので、そんなに理解は難しくないかと思います。
次にこれらのポイントがFloatなので、この数値をアニメーションさせてみます。
AnimatedMeshGradientView
import SwiftUI

struct AnimatedMeshGradientView: View {

    @State private var points: [SIMD2<Float>] = [
        [0.0, 0.0], [0.333, 0.0], [0.666, 0.0], [1.0, 0.0],
        [0.0, 0.333], [0.333, 0.333], [0.666, 0.333], [1.0, 0.333],
        [0.0, 0.666], [0.333, 0.666], [0.666, 0.666], [1.0, 0.666],
        [0.0, 1.0], [0.333, 1.0], [0.666, 1.0], [1.0, 1.0]
    ]

    var body: some View {
        MeshGradient(width: 4, height: 4, points: points, colors: [
            .red, .purple, .indigo, .blue,
            .orange, .cyan, .teal, .pink,
            .yellow, .green, .mint, .teal,
            .blue, .indigo, .purple, .red
        ])
        .frame(maxWidth: .infinity)
        .padding()
        .onReceive(Timer.publish(every: 1.0, on: .main, in: .common).autoconnect()) { _ in
            withAnimation(.easeInOut(duration: 1.0)) {
                animatePoints()
            }
        }
    }

    func animatePoints() {
        points = [
            randomPoint(points[0], fixedX: 0.0, fixedY: 0.0, baseX: 0.0, baseY: 0.0),
            randomPoint(points[1], fixedX: nil, fixedY: 0.0, baseX: 0.333, baseY: 0.0),
            randomPoint(points[2], fixedX: nil, fixedY: 0.0, baseX: 0.666, baseY: 0.0),
            randomPoint(points[3], fixedX: 1.0, fixedY: 0.0, baseX: 1.0, baseY: 0.0),

            randomPoint(points[4], fixedX: 0.0, fixedY: nil, baseX: 0.0, baseY: 0.333),
            randomPoint(points[5], fixedX: nil, fixedY: nil, baseX: 0.333, baseY: 0.333),
            randomPoint(points[6], fixedX: nil, fixedY: nil, baseX: 0.666, baseY: 0.333),
            randomPoint(points[7], fixedX: 1.0, fixedY: nil, baseX: 1.0, baseY: 0.333),

            randomPoint(points[8], fixedX: 0.0, fixedY: nil, baseX: 0.0, baseY: 0.666),
            randomPoint(points[9], fixedX: nil, fixedY: nil, baseX: 0.333, baseY: 0.666),
            randomPoint(points[10], fixedX: nil, fixedY: nil, baseX: 0.666, baseY: 0.666),
            randomPoint(points[11], fixedX: 1.0, fixedY: nil, baseX: 1.0, baseY: 0.666),

            randomPoint(points[12], fixedX: 0.0, fixedY: 1.0, baseX: 0.0, baseY: 1.0),
            randomPoint(points[13], fixedX: nil, fixedY: 1.0, baseX: 0.333, baseY: 1.0),
            randomPoint(points[14], fixedX: nil, fixedY: 1.0, baseX: 0.666, baseY: 1.0),
            randomPoint(points[15], fixedX: 1.0, fixedY: 1.0, baseX: 1.0, baseY: 1.0),
        ]
    }

    func randomPoint(_ point: SIMD2<Float>, fixedX: Float?, fixedY: Float?, baseX: Float?, baseY: Float?) -> SIMD2<Float> {
        SIMD2<Float>(
            x: fixedX ?? baseX! + Float.random(in: -0.10...0.10),
            y: fixedY ?? baseY! + Float.random(in: -0.10...0.10)
        )
    }
}
細かな説明は省きますが、メッシュを4*4にして、それぞれの端と角は固定、それ以外の部分は-0.1~+0.1分だけランダムに増減させるだけのシンプルなアニメーションです。
次に、このAnimatedMeshGradientViewをTextでmaskしてみます。
AnimatedMeshGradientText
import SwiftUI

struct AnimatedMeshGradientText: View {

    let text: String

    var body: some View {
        AnimatedMeshGradientView()
            .frame(height: 100)
            .mask(
                Text(text)
                    .font(.system(size: 50, weight: .bold))
                    .frame(maxWidth: .infinity, maxHeight: .infinity)
            )
    }
}

#Preview {
    AnimatedMeshGradientText(text: "Romiick LLC.")
}
少し分かりづらいですが、MeshGradientをAnimationして、TextでmaskするということはSwiftUIでは簡単にできてしまいます。いいですね。
SwiftUIでのグラデーションまとめ
ここまでSwiftUIでのグラデーションを網羅的に見てきましたが、やはり最もよく使うのはColor.blue.gradientという一番シンプルなものではないでしょうか。
その他、基本としてLinearGradientとその中で出てくるGradient.Stopを理解しておけば、あとはいくらでも調べ持って、やりたい実装にたどり着けるかなと思います。
実際にLinear以外のグラデーションを使用する場面にはまだ私は出会ったことがないです。複雑なものは画像で対応することが多いですし、アプリ側で実装するとすればシンプルなものぐらいです。
とはいえ、アプリ側でのグラデーションを理解しておけば、画像を減らし容量を削減できたりなど、メリットはあると思います。
是非グラデーションで遊んでみてください。
今回のコードはすべてGithubにて公開しています。